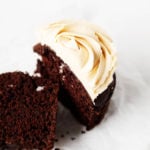
Vegan Chocolate Peanut Butter Cupcakes
Author -Yields: 12 servings
Ingredients
For the cupcakes
- 2 cups unbleached, all-purpose flour (240 g)
- 1/2 cup Dutch process cocoa powder (50 g)
- 3/4 cup + 2 tablespoons cane sugar (170 g)
- 1/2 teaspoon Kosher salt
- 1/2 teaspoon baking soda
- 1 teaspoon baking powder
- 1 1/4 cups cold water (10 fluid oz.)
- 1 teaspoon apple cider or white vinegar
- 1 teaspoon Nielsen-Massey Ugandan Pure Vanilla Extract
- 1/3 cup avocado oil (or another neutral vegetable oil; 2.66 fluid oz.)
For the creamy peanut butter frosting
- 8 tablespoons vegan butter of choice, at room temperature (115 g)
- 8 tablespoons smooth peanut butter (130 g)
- 2 cups confectioners sugar (240 g)
- 1/2 teaspoon Nielsen-Massey Madagascar Bourbon Pure Vanilla Extract
- 1 tablespoon oat, soy, almond, or cashew milk
Instructions
- Preheat your oven to 350F. Lightly oil or line a muffin/cupcake baking sheet. To prepare the cake, whisk the flour, cocoa, sugar, salt, baking powder and baking soda together in a large mixing bowl. In a separate bowl, whisk together the water, vinegar, vanilla and oil. Add the wet ingredients to the dry ingredients and whisk until batter is shiny and smooth (a few tiny lumps is OK).
- Pour the batter into the prepared muffin pan and bake for 25 minutes, or until the cupcakes have firm tops and a toothpick inserted into one of them emerges clean. Allow the cupcakes to cool for 10 minutes in the pan, then transfer them to a wire cooling rack and allow them to cool entirely before decorating.
- To prepare the frosting, place the butter and peanut butter into the bowl of a stand mixer fitted with the paddle attachment. Add the vanilla and sugar. Mix on low speed for 2 minutes, until you have a smooth mixture. Scrape the sides of the bowl down with a spatula and swap the paddle attachment for the whisk attachment.*
- Mix again on low speed, drizzling in the tablespoon of non-diary milk as you go. The icing should stay thick and spreadable but become creamy and loose enough to be able to pipe
smoothly. If you need an extra drop or two of non-dairy milk, use your judgment and add it.** - Follow the “Better Your Bake” video instructions for preparing a piping bag and decorate your cupcakes. Alternately, use a piping bag to decorate as desired. Enjoy!
Notes
*If you don't have a stand mixer, mix with a hand-held beater on low speed to incorporate all ingredients except for the non-dairy milk. Then add the milk and whisk by hand (using a regular whisk) to finish the icing.