November 16, 2023
If you’ve ever wondered whether you can roast frozen frozen vegetables directly from the bag, then this recipe for roasted frozen cauliflower florets is for you! The florets are savory and super tasty, and they’re incredibly easy to make. Consider the recipe a convenient, last-minute vegetable side dish that will add flavor and nutrition to any meal.
I’ve been sharing some recipes lately for easy vegetable side dishes—dishes that can help to put more vegetables onto your lunch or dinner plate, quickly.
This is one of my easiest vegetable sides yet.
When I was writing The Vegan Week, I had an internal debate about whether or not to include my from-frozen broccoli florets.
These are just what they sound like—broccoli florets that are roasted from a store-bought, frozen state.
Part of me felt as though it was a little absurd to include them, since they’re not even seasoned.
Yet the truth is that I made them every single week during my clinical internship. And the whole point of that cookbook was to capture weekly meal prep strategies that have helped me through busy times.
These roasted frozen cauliflower florets are a little more hands-on than the broccoli recipe in The Vegan Week, but not by much.
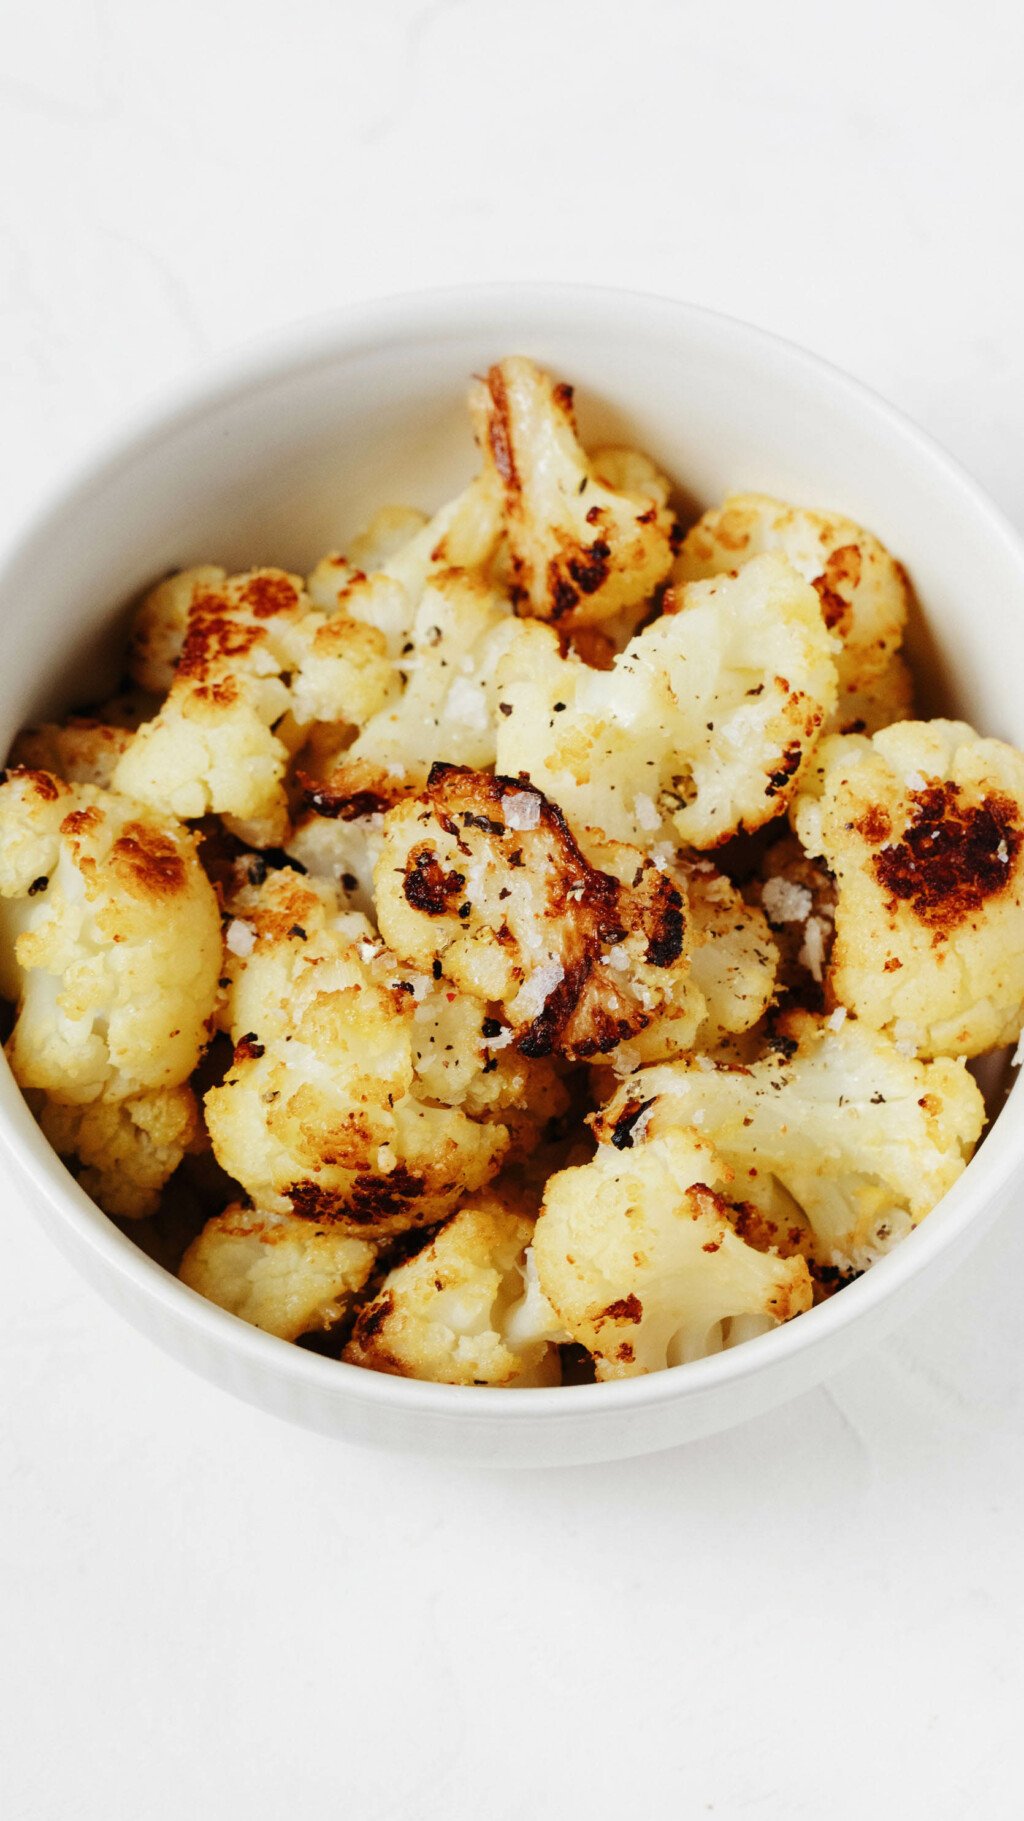
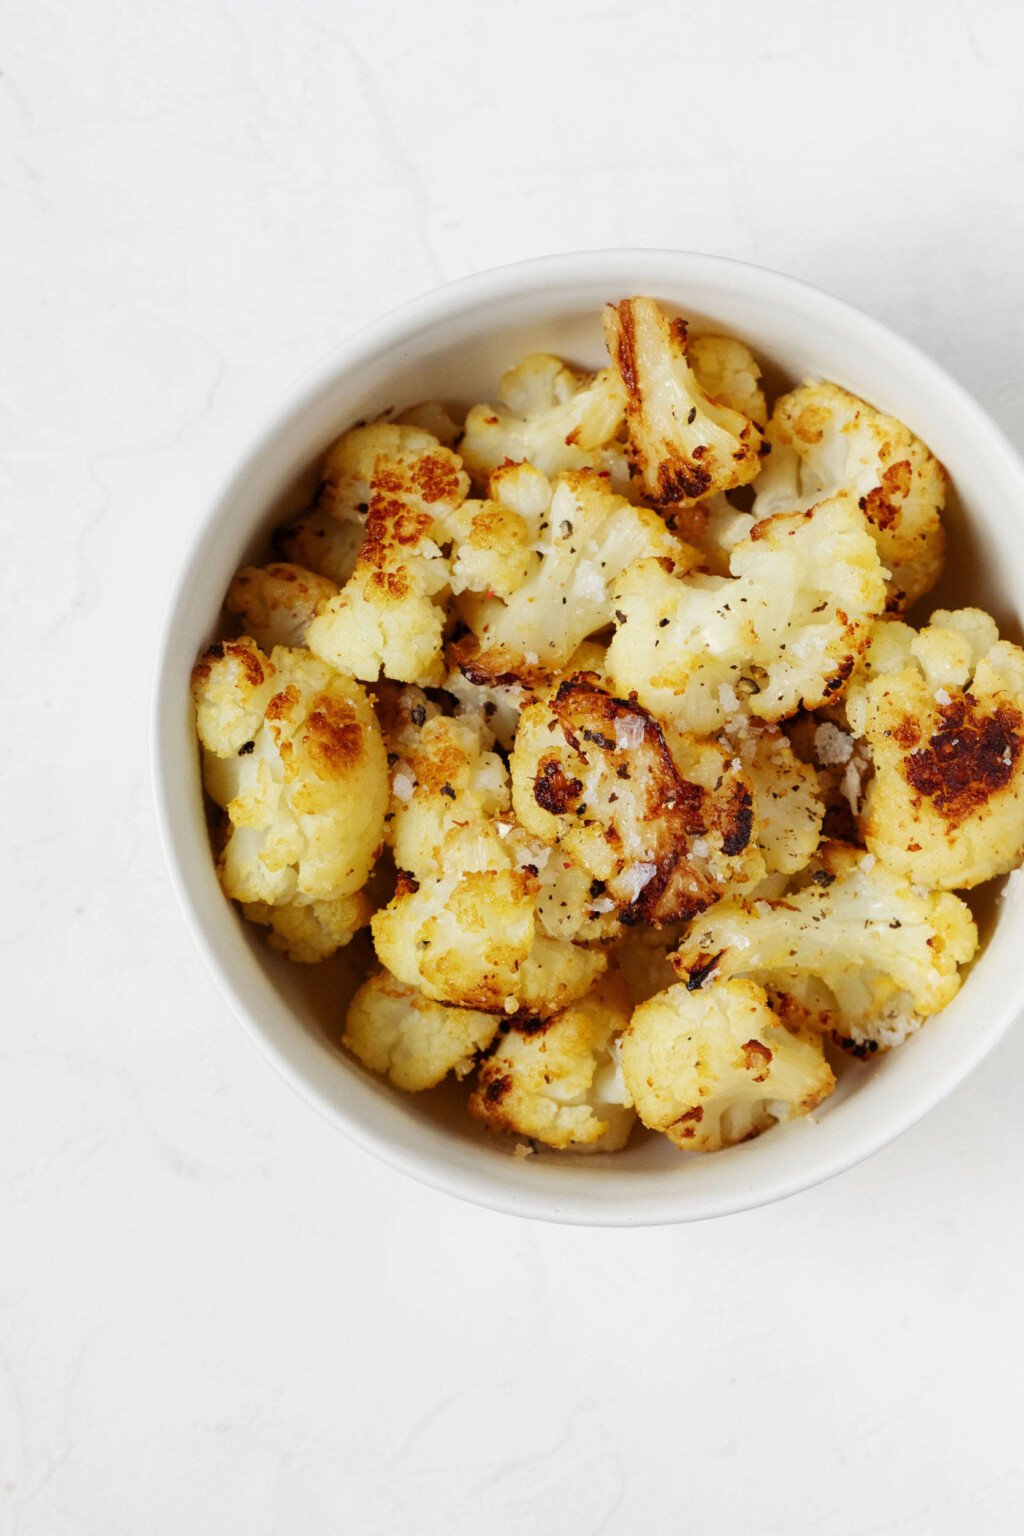
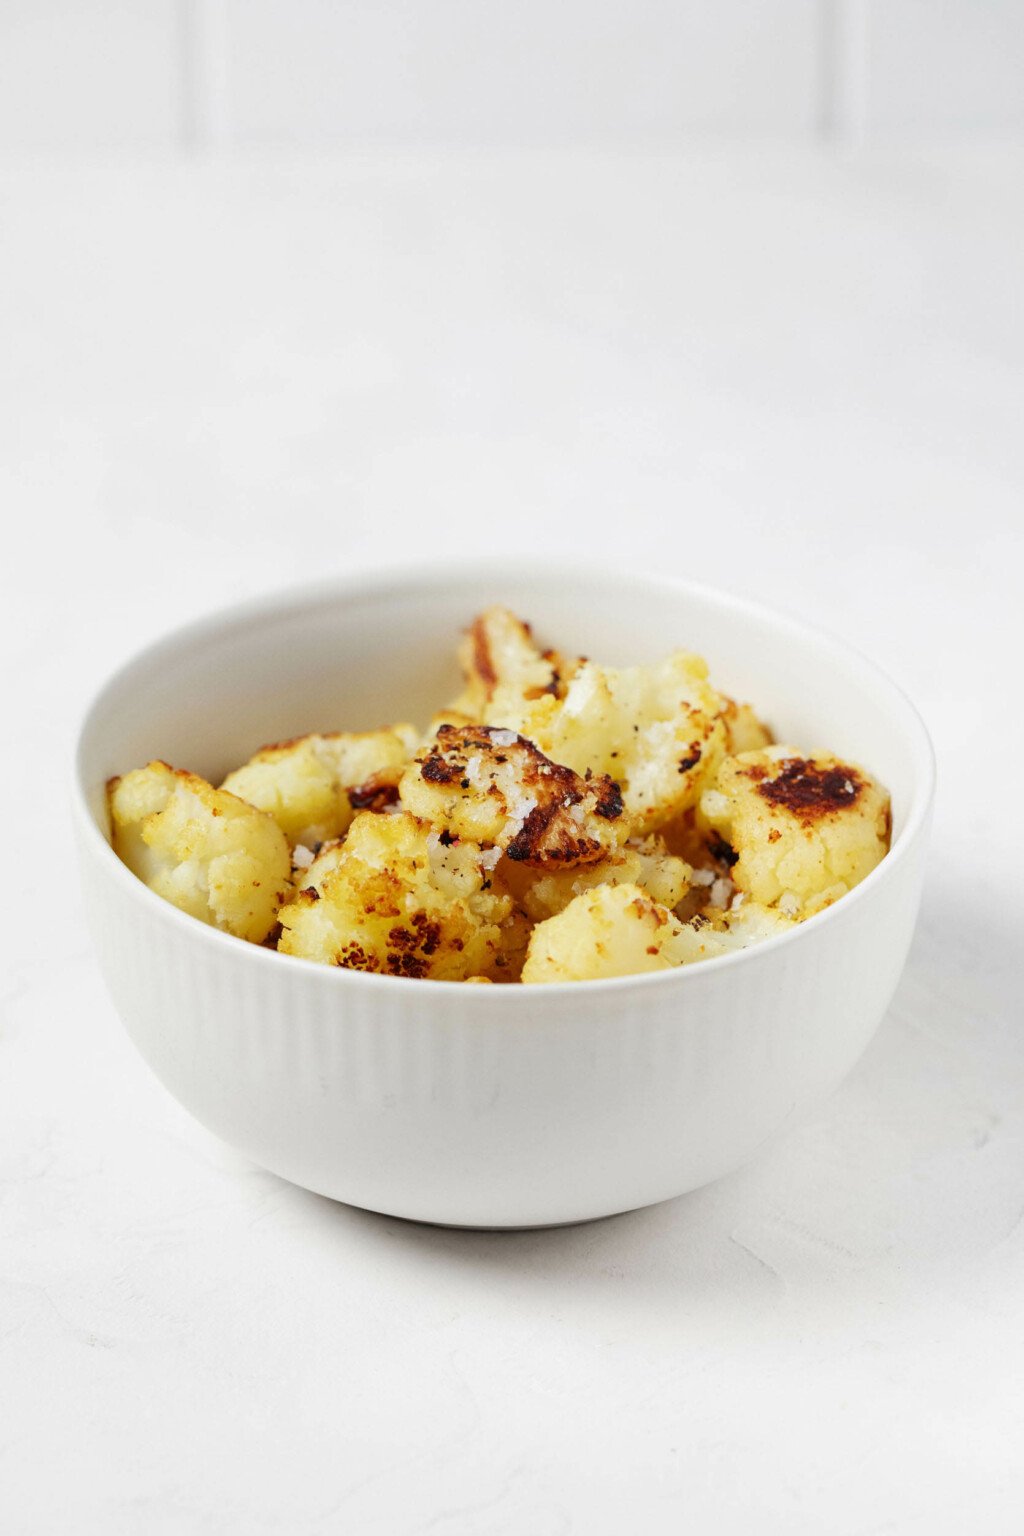
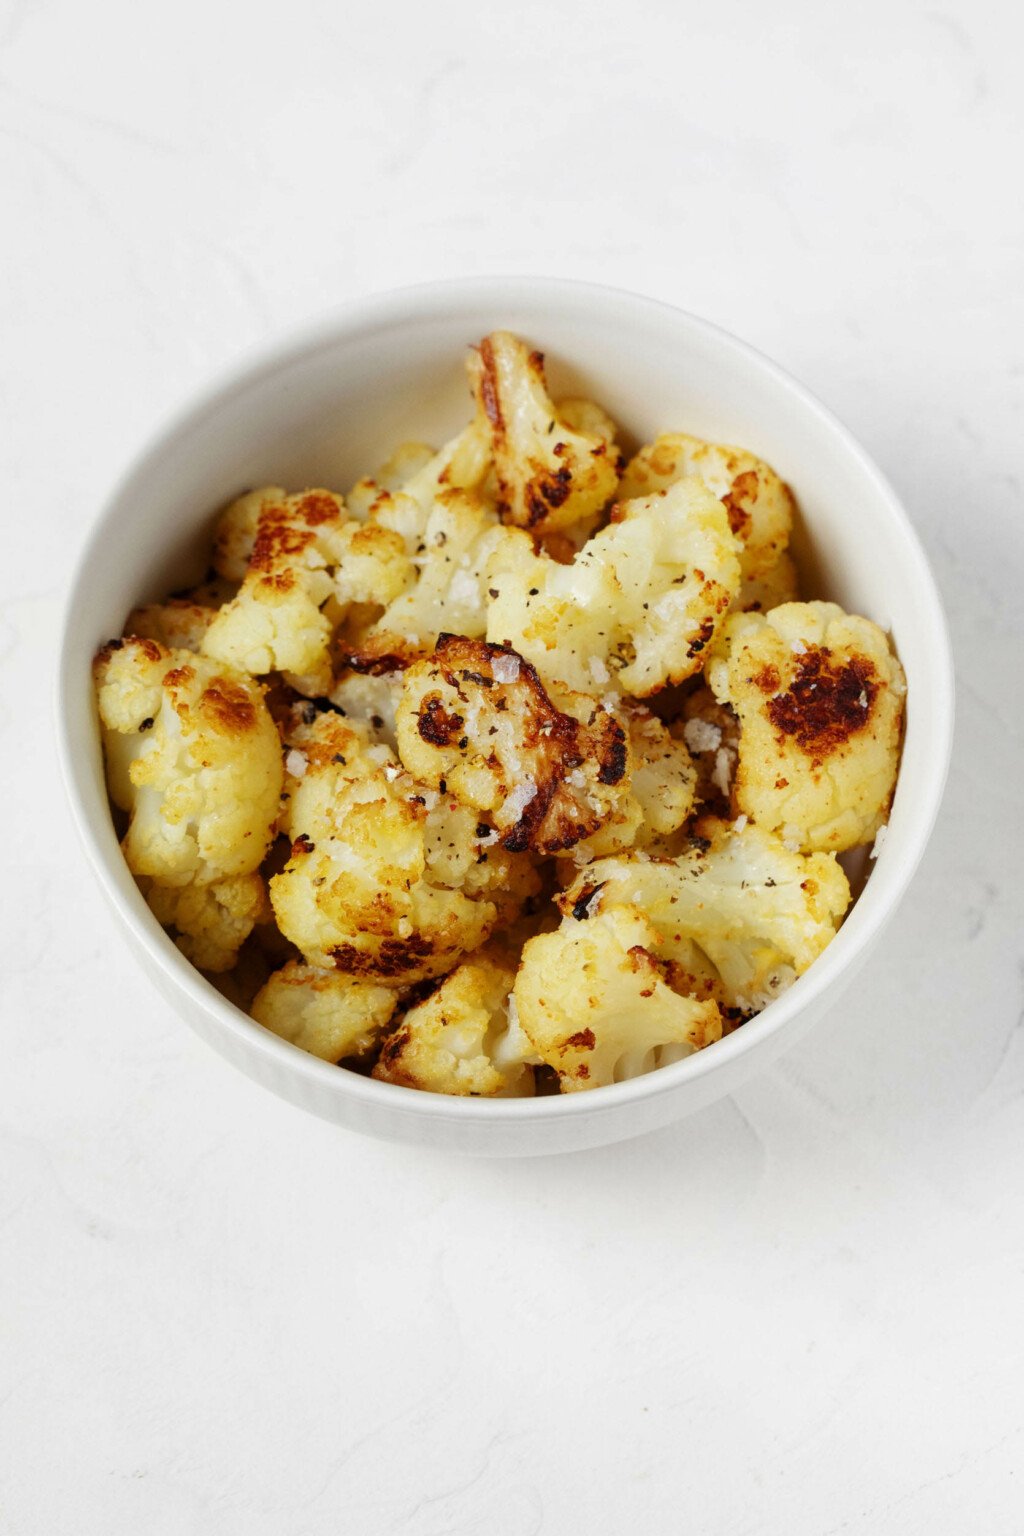
The florets are savory, salty, a little cheesy, and quite delightful—especially given how easy they are to make!
In praise of frozen vegetables
A nutritious choice
I think public perception is changing around frozen vegetables. More and more, I see articles that affirm their nutritional value.
Yet for a long time—until I did my training as a dietitian—I believed that frozen vegetables were less nutrient-dense than fresh.
If you have had a similar idea, then you might find it freeing to know that commercially frozen vegetables can be as nutritious as their fresh counterparts. Sometimes, in some ways, they’re actually more nutrient-dense.
This is because most commercially frozen produce is intentionally picked at its peak of ripeness. The vegetables are then flash cooked—typically, they’re blanched—and then frozen.
Blanching is a rapid cooking process that preserves most of the vegetables’ nutrition. Vegetables reach the consumer in such a way that their nutrition at peak ripeness is preserved.
On the other hand, fresh produce often has to travel long distances to reach the consumer, especially in the case of produce that is purchased non-locally.
As a result, vegetables sold fresh are sometimes picked before peak ripeness, at which point they haven’t yet reached nutritional maturity, so to speak.
At other times, they can lose nutrient-density over the course of the long transition from harvesting to being sold.
Recent studies (1, 2) have indicated that frozen fruits and vegetables are comparable to fresh counterparts. Sometimes, their nutrient concentration is higher.
There are exceptions; beta-carotene is typically lower in frozen vegetables, and some antioxidant activity may be impacted by freezing (3). Overall, though, frozen vegetables hold their own in comparison to fresh.
Now, this fresh and frozen comparison would probably shift if one were to compare commercially frozen vegetables with locally grown, fresh vegetables that were picked at peak ripeness.
But many of us aren’t able to purchase local, in-season, and optimally ripe produce all of the time.
So, if purchasing frozen produce is the most sensible, feasible, or convenient option for you at any given moment, then you can rest assured that it won’t cost you any significant nutrition. In the case of some nutrients, it might be advantageous.
A convenient choice
I love to eat with the seasons and support local farmers when I can. But I often go through periods when purchasing or preparing fresh vegetables from scratch is tough for me.
For example, during my clinical training, I had to meal prep three meals for every single day of the work week. With proteins and balanced meals to think about, I really couldn’t spend too much time on vegetable sides.

The Vegan Week
Embrace the joy of eating homemade food every day with the hearty and wholesome recipes in The Vegan Week.
Whether you have three, two, or even just one hour of time to spare, The Vegan Week will show you how to batch cook varied, colorful, and comforting dishes over the weekend.
Frozen vegetables were a lifesaver at that time. (Incidentally, that year was also my catalyst for learning to roast frozen vegetables in the oven, rather than cook them exclusively in the microwave.)
Last fall, I was working very long hours with my practice, and I suffered from some burnout. Once again, frozen vegetables came to my rescue.
They allowed me to eat plentiful and varied vegetables without causing me any stress. And they prevented me from buying beautiful fresh produce that would spoil because I couldn’t find time to cook it—always a major bummer.
The strategies that I share with my clients are often strategies that I’ve developed through personal experience.
In the past couple years, I’ve championed frozen veggies to clients who complain of not having time to prepare vegetables to eat with their meals.
Sometimes, my clients express surprise; I think they expect an RD to tell them that fresh is best.
Instead, I tell them that frozen is totally OK, if they want it to be OK.
Yes, fresh vegetables are often preferable to frozen from a texture, and sometimes a flavor, perspective.
But there are times when convenience matters most. Frozen broccoli florets, green beans, mixed vegetables, and these roasted frozen cauliflower florets have been good friends to me during such times.
Head’s up…
A quick word about food safety: even though frozen vegetables have been flash cooked before freezing, it’s important to cook them according to package instructions before eating.
In this case, oven-roasting serves as a means of full heating the florets, so that they’re safe for consumption.
How to roast frozen cauliflower florets
Technically, roasting frozen cauliflower florets can be as simple as placing them on a nonstick or parchment or foil-lined baking sheet, transferring them to a hot oven, and cooking them through.
I like to add seasonings that give the finished florets good flavor and a pleasant texture. Here’s what I do.
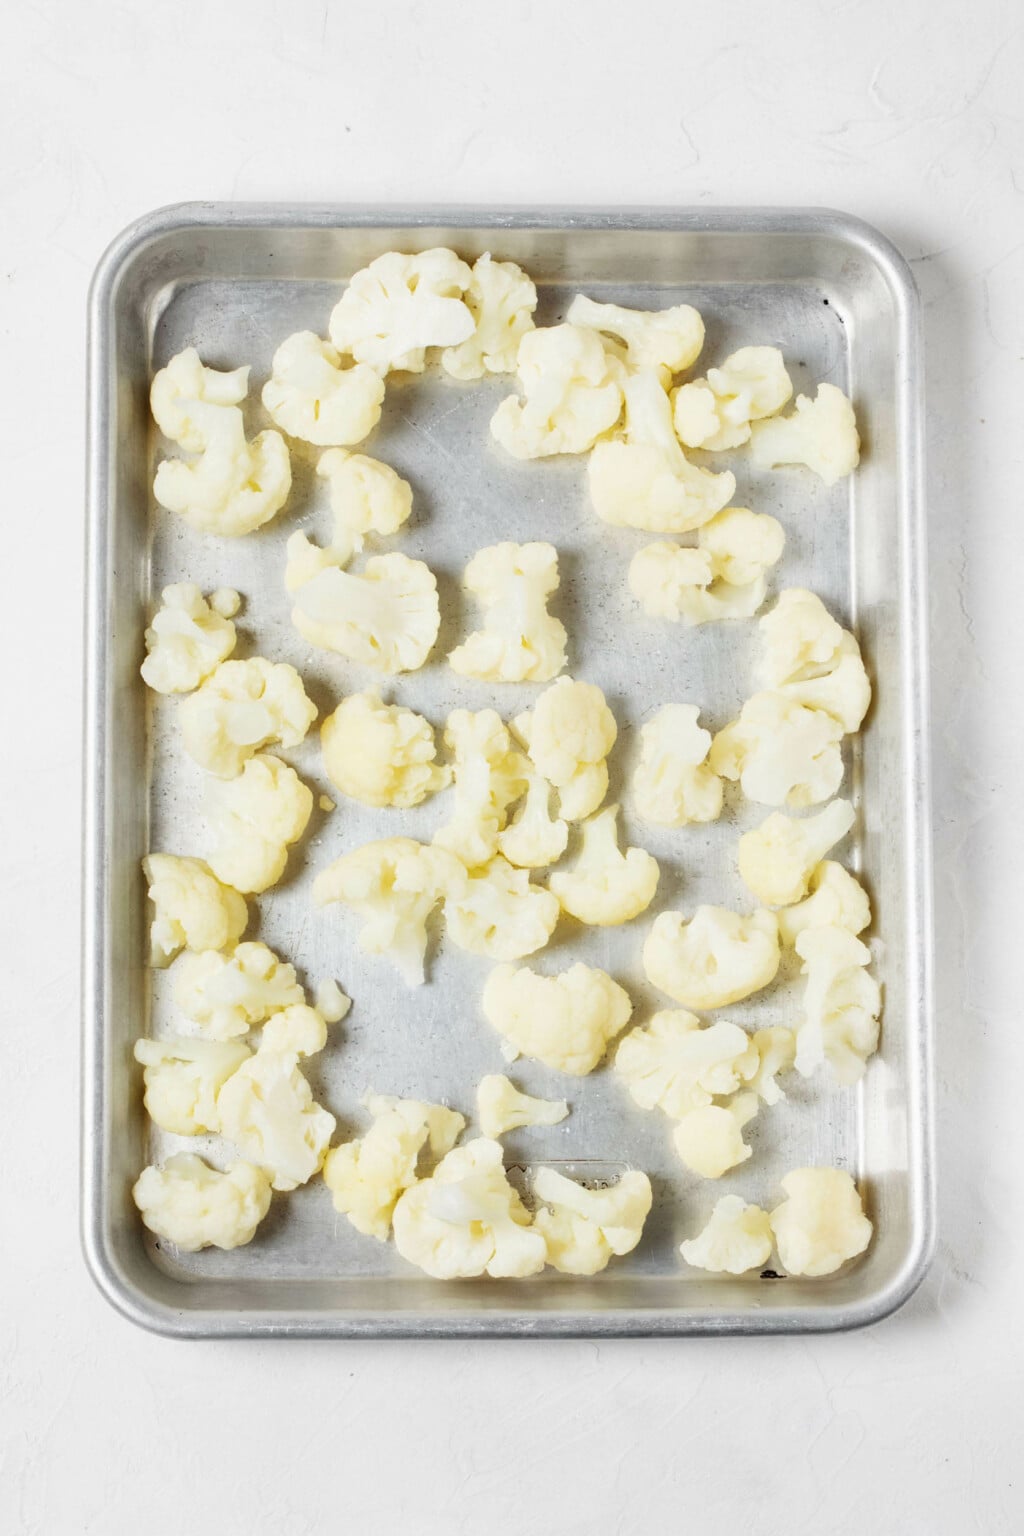
Step 1: Roast the “naked” (i.e. unseasoned) cauliflower florets for 15 minutes
First, I should make clear that you don’t have to defrost the florets before you roast them. They go directly from their frozen state into the oven. That’s part of what makes the recipe so easy!
In the first step of this cooking process, you’ll roast the cauliflower “naked”, or “dry,” for fifteen minutes.
In other words, you’ll cook the florets without adding any seasonings. You can add a tiny bit of oil to your baking sheet if you don’t use a non-stick baking sheet.
The point here is to essentially defrost the florets—to allow them to thaw, and only begin to cook, in the oven.
The true “roasting” part of this recipe comes next.
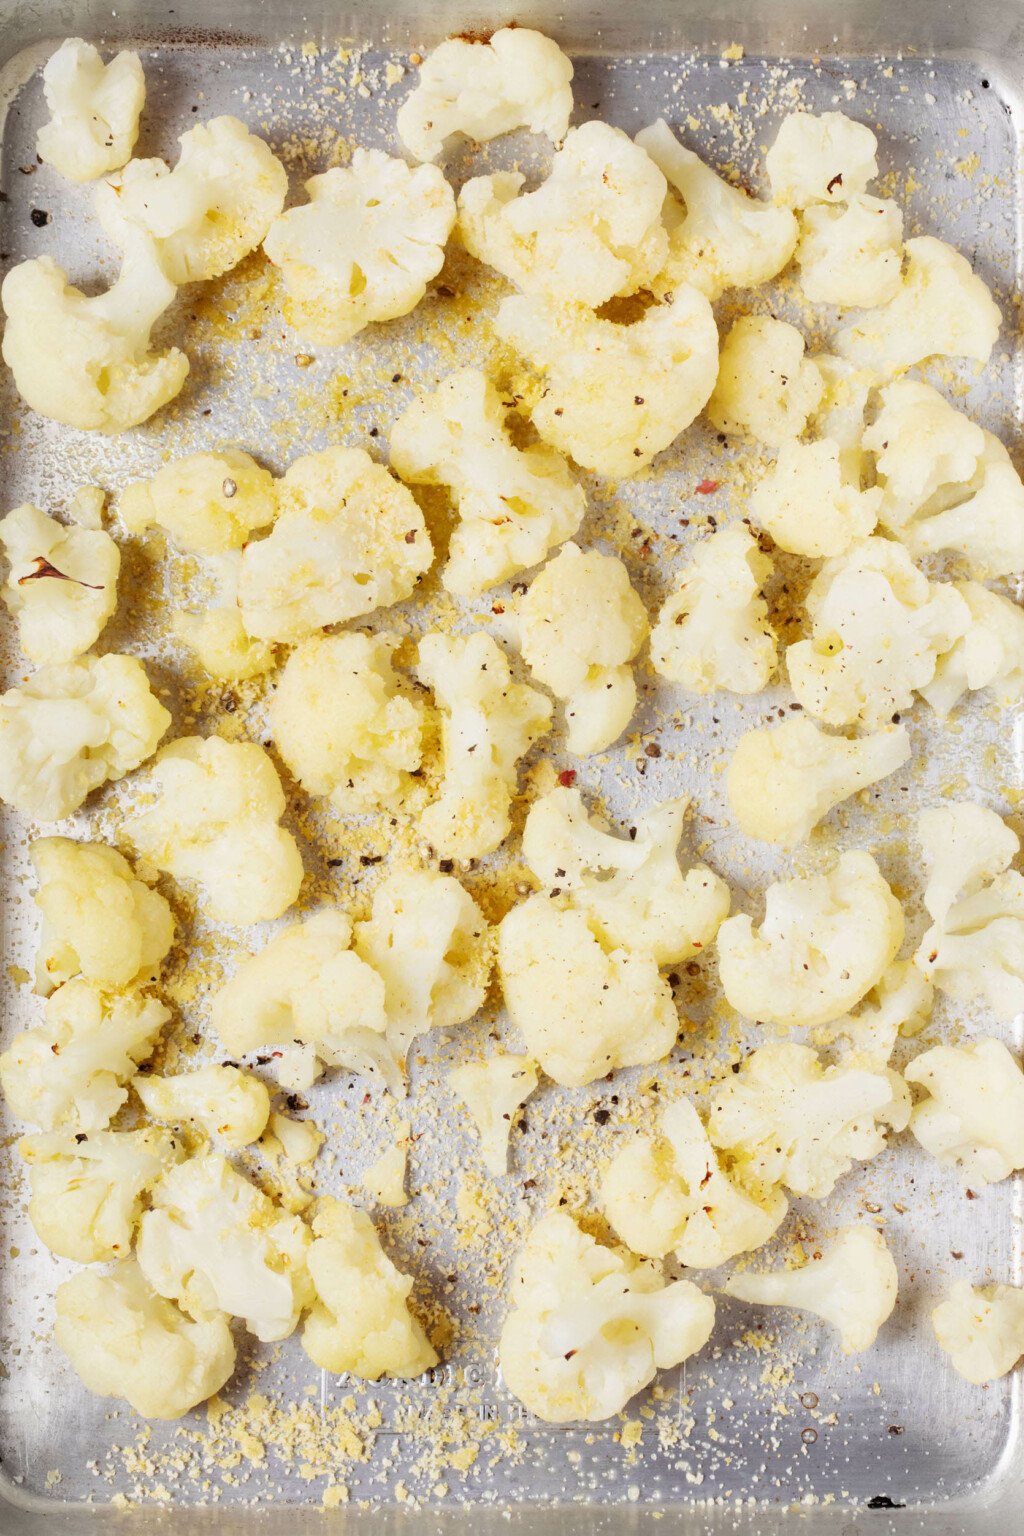
Step 2: Add olive oil and seasonings
After those first 15 minutes roasting at 425°F / 220°C, you’ll remove the cauliflower florets from the oven and add some seasonings.
The seasonings that I use, and which I’ll share in my roasted frozen cauliflower florets recipe, are:
- Garlic powder
- Salt
- Freshly ground black pepper
- Vegan cashew parmesan cheese or nutritional yeast
The flavor profile I’m aiming for is cheesy, savory, salty, and garlicky.
Of course, you could choose an entirely different flavor profile altogether. I love roasting cauliflower with a mix of turmeric, ground ginger, and Madras curry powder, for example.
It can also be fun to roast the florets with hot sauce and vegan butter, Buffalo-style.
Add whatever seasonings are calling to you to the florets, then stir them to distribute everything evenly.
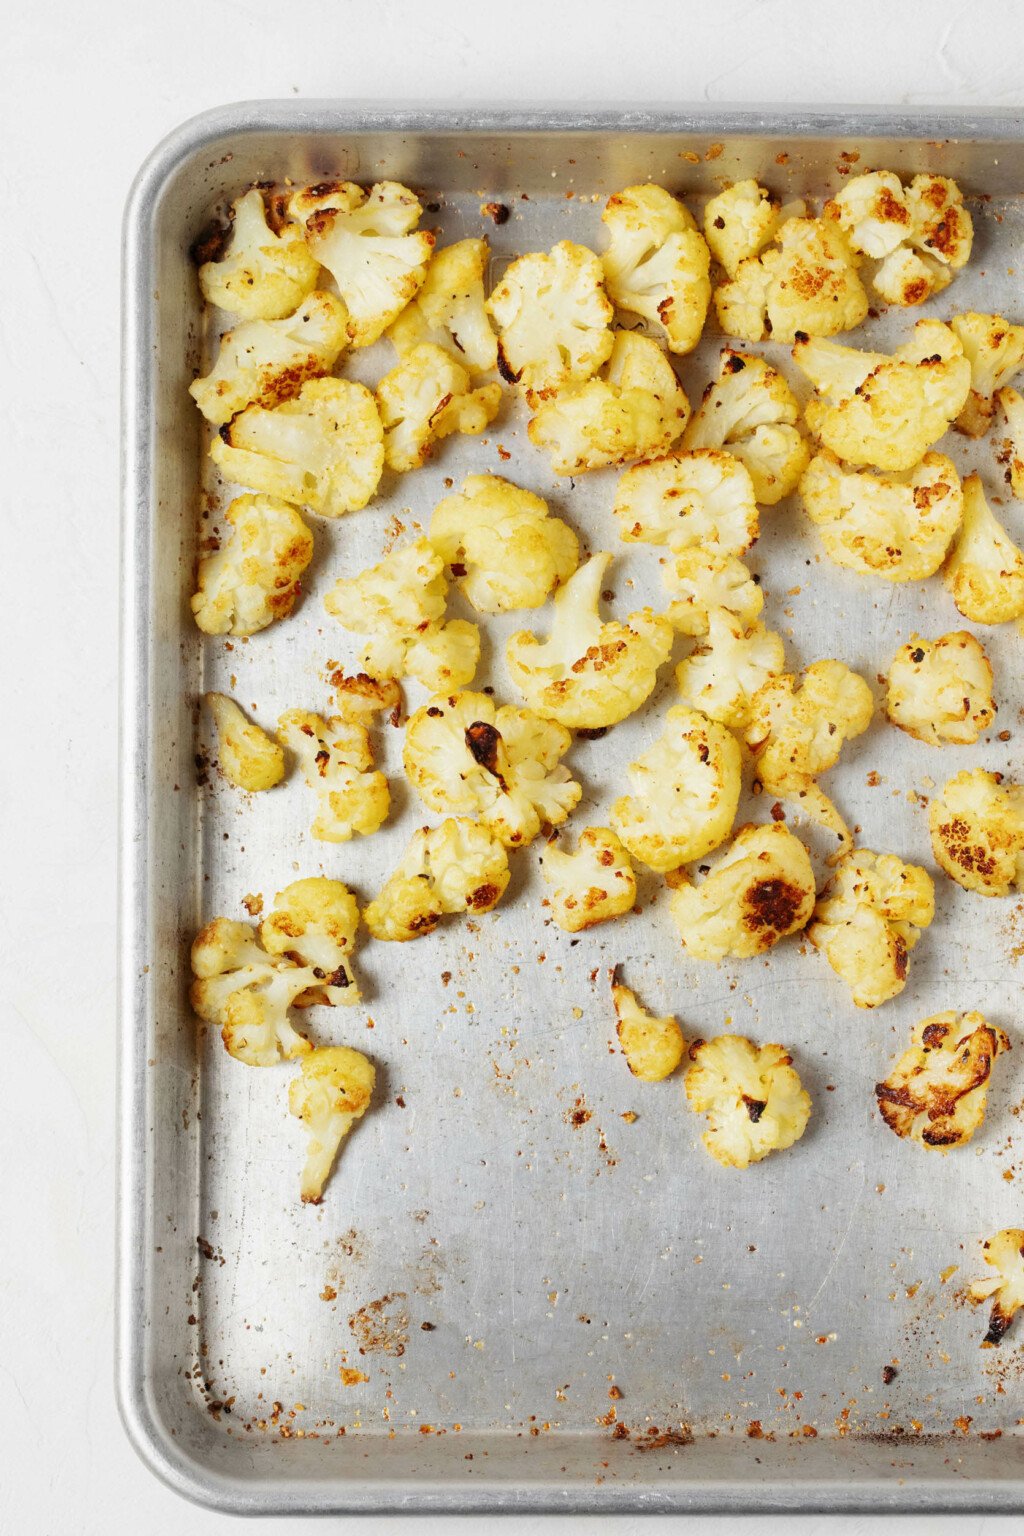
Return the florets to the oven and roast for another 15-20 minutes, or until they’re crisping and turning golden at the edges.
Step 3: Serve
I often enjoy the cauliflower florets exactly as they are when they emerge from the oven. I think they’re incredibly tasty, just as they are.
However, you can add extra flavor with any of the following:
- A squeeze of freshly squeezed lemon juice
- A few spoonfuls of Greek Vinaigrette or Simple Champagne Vinaigrette
- A drizzle of white balsamic or balsamic vinegar
- A handful of fresh, finely chopped herbs
- Dijon Lemon Tahini Dressing or Delightfully Green Tahini Dressing
- Toasted pine nuts (or another toasted seed or nut)
- Breadcrumbs
You could add these components to the baking sheet or spoon them onto individual servings of the cauliflower.
What to pair with roasted frozen cauliflower florets
I can think of many recipes and components that work nicely with the roasted florets. Here are some recipes that I’ve served and enjoyed along with them:
Pastas
- Smoky red pepper pasta
- Sun dried tomato pesto and pasta
- Spring vegan pasta primavera
- Vegan pasta bake with ricotta
- Vegan feta pasta
- Balsamic roasted vegetable pasta
- Beans and greens pasta
Soups & stews
- Rustic vegan potato kale soup with sausage
- Vegan avgolemono soup
- Hearty vegan French lentil soup
- Super simple, very green soup
- Vegan tortellini soup
- Tomato bread soup
- Creamy roasted garlic chickpea soup
Grain dishes
- Grain, green, and bean skillet with yum sauce
- Simple, savory mushroom farro
- Carrot beet farro salad
- Chickpea orzo with homemade roasted tomato sauce
- Lemon dill zucchini chickpea rice
- Quinoa kale stuffed sweet potatoes
- Millet and roasted carrot pilaf
Really, though, the point of the roasted frozen cauliflower florets is for you to have an easy, delicious vegetable side that you can make anytime, so long as you keep your freezer stocked.
I hope that you develop your own ideas about what to serve the florets with.
Can I make my own frozen cauliflower?
Yes, you can. I’ve never done this, so I don’t have insider tips, but I know that it’s possible. Check out some instructions here or here.
Meal prep and storage
Once prepared, the roasted cauliflower florets will keep in an airtight container in the fridge for up to four days.
Technically, you could re-freeze and then re-heat them. It’s safe to do that. However, I’ve tried it, and I think that the texture starts to suffer, so I recommend using them within four days of roasting.

Roasted Frozen Cauliflower Florets
Author –Yields: 4 servings
Ingredients
- 16 ounces frozen cauliflower florets, not defrosted (455g)
- 1 tablespoon olive oil, plus a little extra for the roasting pan
- 1/4 teaspoon garlic powder
- Salt
- Freshly ground black pepper
- 1-2 tablespoons cashew parmesan cheese (to taste; substitute nutritional yeast)
- Optional: Freshly squeezed lemon juice, fresh, chopped parsley, vinaigrette of choice, tahini dressing, chopped nuts or seeds,
(for finishing)
Instructions
- Preheat the oven to 425°F / 220°C and line a baking sheet with foil. Alternatively, use a nonstick baking sheet. Drizzle just a tiny bit of olive oil onto the foil or baking sheet and use your fingers or a pastry brush to rub it around. The cauliflower florets should roast without oil for the first 15 minutes of baking; this small amount of oil is just to prevent too much sticking.
- Transfer the frozen florets onto the baking sheet. Roast the florets for 15 minutes. At this point, they'll no longer be frozen, but they won't yet be roasted. Drizzle the tablespoon olive oil over the florets, then dust them with the garlic powder, a pinch of salt, a few turns of freshly ground black pepper, and the cashew parmesan cheese or nutritional yeast. Mix the florets on the sheet with a spoon or spatula.
- Return the florets to the oven. Roast for another 15-20 minutes, or until they're browning and very tender.
- Add any additional finishing ingredients you like, and serve.
I know that this is a simple recipe, but it’s the sort of recipe you might be glad to have one night when you’re tired, you haven’t had time to pick up fresh produce, and you know that your meal would be even better with a savory, nutritious vegetable side.
I hope the roasted frozen cauliflower florets will come to your rescue then, just as they’ve come to my rescue many times over. Enjoy!
xo
1. Bouzari A, Holstege D, Barrett DM. Mineral, fiber, and total phenolic retention in eight fruits and vegetables: a comparison of refrigerated and frozen storage. J Agric Food Chem. 2015;63(3):951-956. doi:10.1021/jf504890k
2. Bouzari A, Holstege D, Barrett DM. Vitamin retention in eight fruits and vegetables: a comparison of refrigerated and frozen storage. J Agric Food Chem. 2015;63(3):957-962. doi:10.1021/jf5058793
3. Neri L, Faieta M, Di Mattia C, Sacchetti G, Mastrocola D, Pittia P. Antioxidant Activity in Frozen Plant Foods: Effect of Cryoprotectants, Freezing Process and Frozen Storage. Foods. 2020;9(12):1886. Published 2020 Dec 17. doi:10.3390/foods9121886
This post may contain affiliate links. If you use these links to buy something I may earn a commission. Visit my privacy policy to learn more.
Categories: Side Dishes,
Vegan Basics
Method: Oven
Ingredients: Cauliflower
Dietary Preferences: Gluten Free, Soy Free, Vegan
Recipe Features: 30 Minute or Less
Method: Oven
Ingredients: Cauliflower
Dietary Preferences: Gluten Free, Soy Free, Vegan
Recipe Features: 30 Minute or Less
")


")

Leave a Comment
Thank you so, so much for sharing recipes like this – ones that are super convenient and easy to make!! Very grateful. Will be trying it out this week; can’t wait!!!
I love these ultra-convenient recipes, too, Laura! Hope you enjoy it.
This looks great! As a chronically ill person, sometimes prep for fresh veg is just one “spoon” too many, but frozen veg and a microwave or oven really do help.
I’m so glad you like the looks of the recipe! One spoon too many is a great way of putting it 🙂